Showing posts with label iheartfaces. Show all posts

Sunday, December 5, 2010

I heart faces. Self Portrait.

Oh I am famous for taking self portraits. Finally gonna show one off!


This is a "double exposure" I was experimenting with, it was rather fun! Make sure to check out the other entries here!


Sunday, August 29, 2010

I made the list!


I got rewarded as Amy and Angie's favorite for the I Heart Faces Challenge, beach fun! I am so excited that my photograph was chosen!

Monday, August 23, 2010

Week #34 Beach Fun!


Sadly there are no oceans in Utah, but I went to the saltiest lake I could find for this picture! You guessed it, the Great Salt Lake. I manipulated this photo so you could see the reflection of my little brother in the water. I tried the effect on a whim, and loved it so much I am trying to make a series! 

DON'T FORGET! 
Look at all the other entries at I Heart Faces, or submit your own!


Tuesday, July 6, 2010

Week #27 Teens Only!


I have only a few more months of being a teen! So I had to make sure I get involved in this challenge :). This is a photo I took of my sister. I was both the photographer and makeup artist. We had a lot of fun doing this shoot!

Tuesday, June 29, 2010

Week #26 Pets Photo Challenge


This weeks challenge is animals only! I tried to find a good picture of my dogs, but I don't have one. So I am using my pet tiger! Just kidding he isn't my pet :]. He lives at the local zoo! I like how the tiger is out of focus. He seems a little less dangerous that way ha ha. Check out the other entries, or submit your own! Go ahead and click the I heart faces button!


Monday, June 21, 2010

Week #25 Celebrating Teens


I just recently took this picture of my sister. We wanted to play around with doing funky makeup, and it was a lot of fun :]


I haven't submitted anything for ages.. it feels good to be back in the game!

Friday, April 23, 2010

Fix it friday #51


Original, I did not take the photo, I just edited it.


My Edit


What I did:
1) First take picture into iphoto
2) Crop around face
3) Adjust levels, Make the dark tab [far left] about 4%. Move middle gray tab over the the left a little.
4) Go to effects +1 fade color.
5) Save and go into photoshop.
6) Use perfect portrait action. You can get it free at coffeshop.
7) Adjust levels to taste. I put them at 9, 1.28, and left the white at defualt
8) Select the mask on the WHITE TEETH layer, make sure you're using the brush tool [set to white] and the opacity should be between 20-30. lightly go over the teeth to make them whiter.
9) Go to the mask on WHITE WHITES layer and lightly go over the whites of the eyes. Opacity should again be 20-30
10) Go to mask on the EYE DEFINE layer. I like to have my brush at 100% for this. Adjust your opacity to taste.
11) Go to BRIGHT EYES layer and paint over the iris of the eye with white, I like to have my opacity around 80-100%. Adjust yours to taste. I go over the pupil of the eye (change brush color to black) and darken it a bit after lightening. I keep the opacity around 20% when darkening. You can also go around the black rings around the iris. Keep opacity low when doing this.
12) Go to soft skin layer, the girl already has pretty good looking skin. I'm just going to lightly touch up around her eyes my opacity is at 20%.
13) Lighten lips (optional). I want her lips to be a little paler. So I'm going to the dodge/burn layer, and I'm going to paint very VERY lightly over the lips. I'm using the brush [with white] and the opacity is at 12%. Blend mode lighten. Avoid touching the skin.
14) There is a vignette layer, I am going to duplicate it, change the opacity to 70%, then merge those two layers so the vignette is a little darker. Adding the second layer and merging makes the vignette more pronounced. It will draw you in a little more to her face, I personally like this. Do not merge the vignette if you want a more natural looking image.
15) The sharpen layer is invisible by default. You can keep it and adjust to taste, I didn't use it. I also deleted the urban grit layer.
16) Bring back color: go to the VIVD COLOR layer mask. Select your brush tool [with white] and set the opacity to 100%, blend mode normal. Go over the scarf, hair, and hat to help bring back the color.
17) Save and submit to ihearfaces :]
Check out the other entries here!

Monday, April 19, 2010

I Heart Faces Week 16

Collage Entry
It took me forever to decide what to do for my photo entry. But I finally got inspired to do something! I had originally tried applying this concept to a different photo but I didn't get it quite right so I tried it again and I think it is pretty cool :]. Make sure you check out the other entries! Or submit your own.


It's ok to be a follower.

Friday, April 16, 2010

Fix it friday #50

As always not I did not take the photo I just edited it. The first image is the original, below are my two edits. I apologize I do not have a step by step of what I did this week, I did not have time to write it. If you would like me to write out what I did please leave a comment and I'll try to write one out for you. Make sure you say which edit you want instructions for! Or I can do both if I get enough comments asking.


I can't decide which edit I like more.. I love doing the gradient color [like the above image] It may not look like a gradient but I paint it on and blend it in. But I also love the second one!

Have a great week! Make sure to check out the other entries here.

Please follow.

Monday, March 29, 2010

I heart faces week 13

Dramatic Black and White


I had such a hard time choosing a photo to enter! I was thinking about scanning in some of my film prints to use but then decided I would go with this picture. I love it so much! Make sure you check out the other entries! Don't forget to follow my blog if you aren't already doing so :].


Friday, March 26, 2010

Fix it friday #48

The image is not my own, I just edited it. The first one is the Original, the second one is my edit, you can follow my steps in the tutorial below the edit.


What I did:

1) I started in iphoto and changed the levels so its 84% on the light side, still 0% on the dark side
2) Put contrast up to 91, saturation to 74, make sure when doing saturation you check the box Avoid Saturating Skin Tones
3) Sharpness to 100, tint to -13
4) Still in iphoto go to effects, and do antique +1, and fade color +2.
5) Now time to go to photoshop. We're going to lighten up the girls eyes and make them pop a bit more. First duplicate the background layer (original photo) I do this just to be safe. Grab your dodge tool and set it to about 98% percent. Go around the iris of the eyes and lighten them up. Now grab your burn tool, set it to 100% and make it the size of the pupil, and darken.
6) Now we're going to add some texture. I got mine from Shadow House Creations. The texture is called Cover Texture.
7)Add new layer and place the texture. This layer should be above both of the photos. Now hold down the ALT key and hover over the line between the texture and your image and then click on it when two circles appear. Make sure you have the texture layer selected and change the blend mode to Darken, the opacity to 88% and the fill to 74%
8) Now round the corners of the image, you can use the Action and download it for free here. Now I go through each layer individually and round the corners because for whatever reason I can't get it to round each layer all at once. I've tried flattening and this still doesn't work. So go through and round all the corners by running the action just hit enter for each window that comes up.
9) Add a clipping mask, you can also get it from coffeshop, I can't find the exact link so just play around on her page and hopefully it turns up :]. I'm using a vintage clipping mask, run the action round corners again (probably could have added the mask first but oh well :]) Now do the same thing where you hover over the line separating the texture and the mask, and click alt. Now you should be able to see your image. It will probably be very dark.
10) Set your blend mode to exclusion, and keep your opacity and fill at default. It may be hard to tell because the mask doesn't do a whole lot but it does add some nice textures and creates a very faint frame.
11) Now submit to iheartfaces and check out all the other entries here!

Monday, March 22, 2010

I heart Faces Week 12

Focusing on Angels
This is a self portrait that I always found interesting. Enjoy :]
Please follow! And check out the other entries here!

Friday, March 12, 2010

Fix it Friday #47


As always note, I did not take the Photo I just edited it. Photo above is the before, and below is my edit. Directions as to what I did are below photos.


What I did:
1) Take picture into iPhoto and change exposure to .76, contrast to 47, and saturation to 73.
2) Put levels so your light side is equal to 77%, light tab will be about half way between the edge and the middle marker, gray tab will be half way between dark marker and middle tab. Leave the dark marker where it is.
3) Go to effects and do +2 Fade color and +1 antique.
4) Save and take picture into photoshop.
5) Add new layer and apply texture, I used the CHAOS texture found here. Yes the texture is free.
6) Apply the texture on top of image, you shouldn't be able to see the image now. Change your blend mode to Overlay, and your Fill to 76% and Opacity to 92%, now you can see the image.
7) Apply Clipping Mask: I got the mask for free here. Sorry I cannot find the direct link. It's a vintage mask and it has 3-4 masks in the set. Apply mask over image and then hold the ALT key and hover over the line separating the texture and clipping mask. Now you'll be able to see through the mask.
8) Round corner action. This step was a bit tricky for me because I have never used actions before. I got the action to round corners for free here. I downloaded it and installed it, and then I had to individually select each layer and apply the action that way. If there is an easier way to do this then please LEAVE A COMMENT telling me how! I was so lost and would much appreciate your help! When the pop up menu comes up for each layer during the action make sure the number is always 100 pixels and just keep hitting enter until it is done.
9) Save image and submit to iheartfaces. See all the other cool entries here!

Thursday, March 4, 2010

Fix it Friday


Original photo on top. There are directions as to what I did below finished product. [I made sure to write what I was doing step by step]. I did not take this photo I simply edited it.

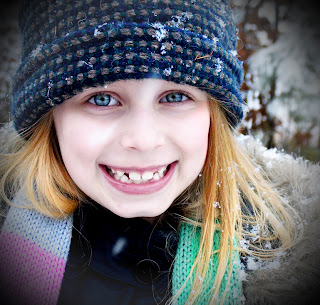
And my finished product


What I did:
1) First I started in iphoto. I typically do the basics in iphoto first, pretty much everything you do in iphoto can also be achieved in photoshop as well. I set the levels to 86% on the light side, and 9% for the darks.
2) Set contrast to -45 and saturation to 96. Check the box that says avoid saturating skin tones.
3) Go to effects in iphoto and set antique to +2, fade color +1, and boost color +2
4) Save the changes and open photo up in photoshop [I'm using CS4]
5) Apply some textures. You can download textures for free here. I am using a texture from one of the fav six minis set. You can download the exact texture here. [The texture I used is the bottom left one]
6) Change blend mode to Darken, then change opacity [to the right of your blending options] to 97% and fill [below opacity] to 80%
7) Lighten eyes. Duplicate image of the child. [This is not necessary but I do it just incase I mess up and can't undo.] Make sure duplicated image is ABOVE original image and BELOW texture image. Get out your dodge tool in the tools palette, put the settings to shadows, exposure 76%. Use a soft brush. make sure your brush is small enough to fit in the iris part of the eye and not go over the pupil or white. Lighten the iris, not too much or you will start seeing pixels. You can go over the dark black circles around the iris as well to lighten them up a bit. Now go to your burn tool and make your brush the size of the pupil. Set exposure to 53% keep at shadow setting and darken the pupil. If you think the eyes are too light you can change you fill to about 90% or until you are happy with the result.
8) Apply border. I got the border here. first I edited it a bit, I applied another texture again from shadow house. That is not necessary. The boarder is white by default, if you wish to change it as I did I recommend editing it BEFORE applying it to your photo. So I pasted the border into the photo ABOVE all the other layers. I rotated it until I got it to fit around the photo the way I want.
9) Submit to iheartfaces

I hope you all have fun fixing photos :] see other entries here!

Monday, March 1, 2010

I Heart Faces Week 9

Hilarious Out takes
These are some photos taken of my siblings, and here my sister thought I deleted all the embarrassing photos of her :) enjoy and check out the other entries.


Friday, February 26, 2010

Fix it Friday

This is the original photo we had to edit. The photo is not mine, I just edited it.
And this is my finished product.
An overview of what I did:
Sorry I didn't keep track of the specifics for every single step but I'll do my best to remember.
1) Took the picture into iphoto and changed the levels, under exposed [not by much] and increased the contrast.
2) Still in iphoto I applied the antique filter, and then upped fade color 1 or 2 slots
3) Now to photoshop, I applied a photo filter, orange and played with the density until I was happy
4) I download all my brushes here, I found some swirly ones I like and dl them to my computer
5) I got two or three different swirl brushes for each corner and rotated them around, and played with size until I was satisfied. Each swirl is completely white with opacity 100% brush mode normal
6) I applied inner and outer glow, opacity 100% each, everything else I left at the default.
7) Then I submitted to iheartfaces :]

*note* The brushes are all free, some artists clarify that they do not want their brushes used if you are making money unless you are paying them or crediting them.

Monday, February 22, 2010

I Heart Faces Week 8

Hands On Fun


I have been following I heart faces for a little while now and I have finally decided to try and enter into this weeks challenge. I'm so excited and I love this photo.